A screenshot exporter for the App Store and Google Play
Overview: this is a tool that helps exporting screenshots with localized text in all the different resolutions required by the Apple App Store and Google Play.
If you are a mobile game developer and have published some apps, you probably have prepared screenshots for the different stores, in varied resolutions, and maybe different languages.

For Squids and Combo Crew, we published the game on the App Store and Google Play. The App Store is 5 screenshots of 3 different resolutions (iPhone 4, iPhone 5, iPad) and Google Play has also 5 screenshots of 2 resolutions that are different from the iOS ones (7 and 10 inches). We also have localized the game in over 8 languages and we had some text on the screenshots, that we wanted localized as well. That makes a total of 5 x 5 x 8 = 200 screenshots to export manually.
It’s ok, it’s an hour of grunt work for sure, but anyone can do it. But when for some reason you want to update something, a text or a picture, that’s another round of manual exports and that’ll become a bit annoying.
We had a very resourceful intern (thanks again Hannes!) who wrote a handy photoshop script that will export all the screenshots for all resolutions from a well set up photoshop file. It’ll save you time for the initial export, and if you have to update something later on, you’ll just have to update the picture or the text once and watch the script do the rest for you.
Here is how it work:
1. Download this package that includes the script and a photoshop template file.
Note: there are two scripts, one for exporting in JPG and one in PNG. I recommend using the JPG one for the stores, as the files will be lighter and upload faster.
2. Open the .psd file and look at it:
– HowTo is just a reminder of how the script works.
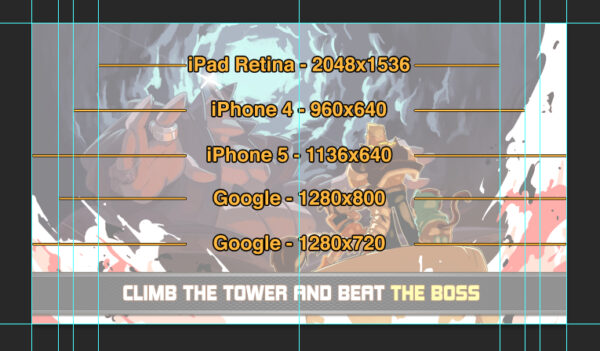
– Sizes are just reminders of the different resolutions.
– Screen1.jpg, Screen2.jpg… are the folders with your 5 screenshots for the App Store and Google Play.

Note that the file is 2726×1536 in size. That’s the iPad retina resolution with the iPhone 5’s ratio. If you optimize for the iPad retina you probably already do your UI and full screen elements with this in mind. If you don’t have 2726 wide screenshot, you can always resize the file to a 1280 or 1136 width after having done the iPad retina ones.
3. Fill with your content:
– Replace the screenshots with yours.
– Replace the text background, or delete it if you don’t need it.
– Enter your texts in the “txt” folder. The layer names will be used in the filenames later on.
Attention: make sure you don’t go further than the boundaries so that the text isn’t cropped on iPad.
4. Export:
– Once this is done, select the screenshot you want to export (a visible layer must be selected for the script to work).
– Click on ExportScreenshotsJPG.jsx. A popup will ask you to confirm you want to launch this script. Go back to photoshop and go make yourself a coffee while it works.
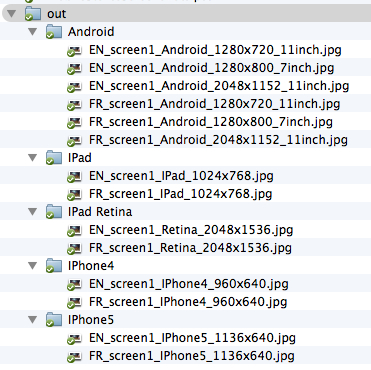
– All the files are going to appear in the “out” folder.
Here an example with only one screenshot and two languages:

Hopefully this will save you some time like it did for us!

